Thursday, May 12, 2016

Final Project Retrospective


For the final project, I wanted to have a fight scene between two characters.  I already had the staff created from my midterm, as well as a sword I made a couple years ago in 3DS MAX.  However, my project idea became more and more far fetched as I continued to put off working on it.  In the end, I was able to put together a very quick back and forth between two characters as I had wanted, although the time constraint required me to be a lot more stringent and frugal with my time than I would have liked.

Originally I wanted to make my own characters for the animation, as 3D modelling is still my favorite step of the project.  But, I had to make my biggest sacrifice there in substituting LowMan instead. The sword I made already fit well with the medieval fantasy theme that the wizard staff from my midterm was going for.  So, I only needed to model a kite shield to go with it.


The sword I referenced when making mine was the Balder Knight's Side Sword from Dark Souls, seen here:

Below that is the sword and its accompanying shield that I made:


Overall I like how the shield came out. It doesn't hold up under very close scrutiny, but the "scratched metal" texture that I used on the sword ended up working very well when placed over top of the blue-and-gold grid blinn used on the shield.


Trying to get the short burst of flame to look okay was one of the harder challenges in this project. The particle emitter would not emulate properly unless a frame was specifically rendered.  So, checking to make sure the fire worked as intended was a very time consuming process that I ended up needing to take a leap of faith on.  It came out better than expected, however the final few frames could be vastly improved.  I didn't see a way to easily get the flame to dissipate, since I could not afford to continue rendering the final frames. I tried to remove visibility of the object the flame was mapped to, but that did not work, so I decided to just cut to the next camera sooner. In retrospect, the flame effect could have been improved if I used a torus rather than a cone to map the flames. Due to the nature of the particle effects, the original shape is indistinguishable anyways, and a torus would allow for a better dissipation of fire by decreasing its inner ring radius.


Overall, I think I did an okay job on the project. There was not enough time to render on a higher quality, so the lighting ended up looking like I didn't actually put lights in the scene at all.  The jittery pace of the scenes made the video feel a little schizophrenic, but in each quick scene the camera was steady and moved exactly how I wanted it to.  I feel the camera work did a competent job of making something decent out of very little.

Final Project Progress Report 2

With 11 hours left until it is time to present final projects (8 hours until the time I would ideally have the animation rendered), progress on my own animation has been slow.  Both characters are for the most part animated, albeit with a few too many shortcuts taken.  Cameras have been added in such a way to hide those shortcuts from being visible as much as possible.

When trying to add a breath of fire coming from the staff (pictured above), the particle effect gets unruly and very quickly engulfs the entire screen with flame, although I am not sure if that problem would carry over to the actual render shots.  At any rate, adding particle effects to a dynamic object (such as this magic spell) is a much different beast than adding effects to a static polygon like the torches from the midterm.

Wednesday, May 11, 2016

Final Project Update 1

With roughly 18 hours left until the due date, work on my final project has officially begun!


So far I have duplicated LowMan, and differentiated them by giving them different textures (a shiny dark grey blinn for the warrior's armor and a deep blue lambert for the wizard's robes). Then, I gave the staff from my midterm to the wizard and parented it to his right hand.
I exported a sword (made as a personal for-fun project) from 3DSMAX for the warrior, and created a similar looking shield to match it, parented to the warrior's left and right hand, respectively.

Catching up on Previous Assignments

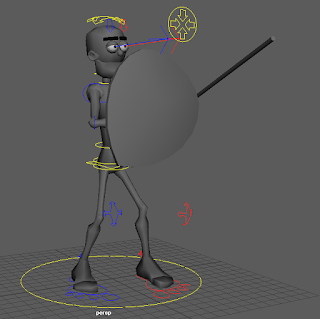
During the last class of the year [5/2/2016] I worked on a previous assignment, practicing animating with LowMan.  Due to computer problems at home I was not able to post to my blog until recently. Seen below are 3 screenshots of LowMan going from T-Pose, into a defensive stance, then striking.
I used direct kinematics to move him around.


Monday, March 28, 2016

Midterm Proposal

For the midterm, I decided I wanted to create a scene that included a wizard's staff that glows, showing off its magical potential.  Afterwards, add to the scene to make it more visually appealing in general.

The staff itself is rather simple, a gemstone-shaped object fitted into the top of a gnarled staff, with an iron cap on the bottom for safety reasons.  One of the biggest parts of this project was getting the gemstone to look adequate in terms of overall color balance, reflectivity, and translucence; as seen in the previous blog post.  Once that was satisfactory, and the basic surroundings were set up, I added a red point light to the center of the gem, key framed to quickly flash twice during the animation, and then went back to the gem's material to add incandescence at the appropriate times, seen below.

I added the iron cap after my initial presentation, which just consisted of creating a curve and revolving it, then spending some time to line it up with the staff, and finally trimming the once meandering tail of the staff to fit inside the newly made cap.

Now that the staff is for the most part completed, I wanted to add variety to the scene.  First, I added torch sconces, because one of my pet peeves is having a scene be lit unrealistically, and the torches allowed me to justify adding some orange lights.  I added a fire effect to the torches, as well as some wall braces, to complete the look.  Unfortunately this wasn't enough light on its own, so I did end up needing to add a dim spotlight to complete the lighting.
After the torches, I turned to add some pots because my scene was still lacking, but for some reason every time I was about to finish the pot, my video card crashed - this happened 3 times - so I decided to leave the scene as is and render.
Self evaluation: Overall, the lighting came out very well, which is what I am always the most concerned about.  The staff could use some more complexity, but adding to it would require a complete overhaul of its design, something to do for the final.  The camera used for the animation was a little shaky, so I need to spend more time in the future smoothing out its motion.  The scene is not very complex, but what is there I think fits together well.

Tuesday, March 8, 2016

Messing with shader options

Pictured above is a very quick "gem shaped" object that's been duplicated, on a plane which exists for testing reflections.  The gem on the right was textured by using a ramp shader preset 'glass' tinted red, and on the left is my attempt to recreate it using a phong. 

I much prefer the reflection created by the ramp shader, but I prefer the reflection within the phong as well as the overall color of it.

Monday, March 7, 2016

Textures and lighting for the bouncing ball

Quick post showing the bouncing ball tutorial with textures and lighting added to the scene. The hoop is a simple color texture, the floor pattern is achieved with a grid style texture with added noise in multiple dimensions, and the ball is an imported file drawn in paint.


Monday, February 22, 2016

February 22nd - Learning to edit CV's and Insert Isoparms

Today I created a simple ice cream cone (out of two cylinders) and then fiddled with the vertices and isoparms of a cylindrical cone until it became roughly the shape of a pile of soft serve ice cream.  It is still a little rough around the edges - I am in the process of figuring out how to add noise to a complex shape (if that is something that can be easily done without downloading other additions to Maya?) as well as trying to get bump mapping to show up on a render and also line up with the texture itself.


Sunday, February 14, 2016

Squashing the Bouncing Ball

An update from the bouncing ball tutorial post:

The "Factor" setting on squash1 does not get saved to keyframe alongside everything else when pressing 'S', you have to right-click the number itself to set keyframe.

Below is a playblast of my ball squashing and stretching as it bounces:

Monday, February 8, 2016

Maya Tutorial 1: Bouncing a ball


Screenshots taken from in-class progress.

Week 1/2 - Learning to work with Autodesk Maya


Figuring out how to create things in Maya by adding a torus and manipulating it to create a simple spaceship.  Inspired by the "Void Seeker" in Starcraft 2.